Operation check program Usage Guide
This page explains how to use DiskShredder ToGo's Operation check program.
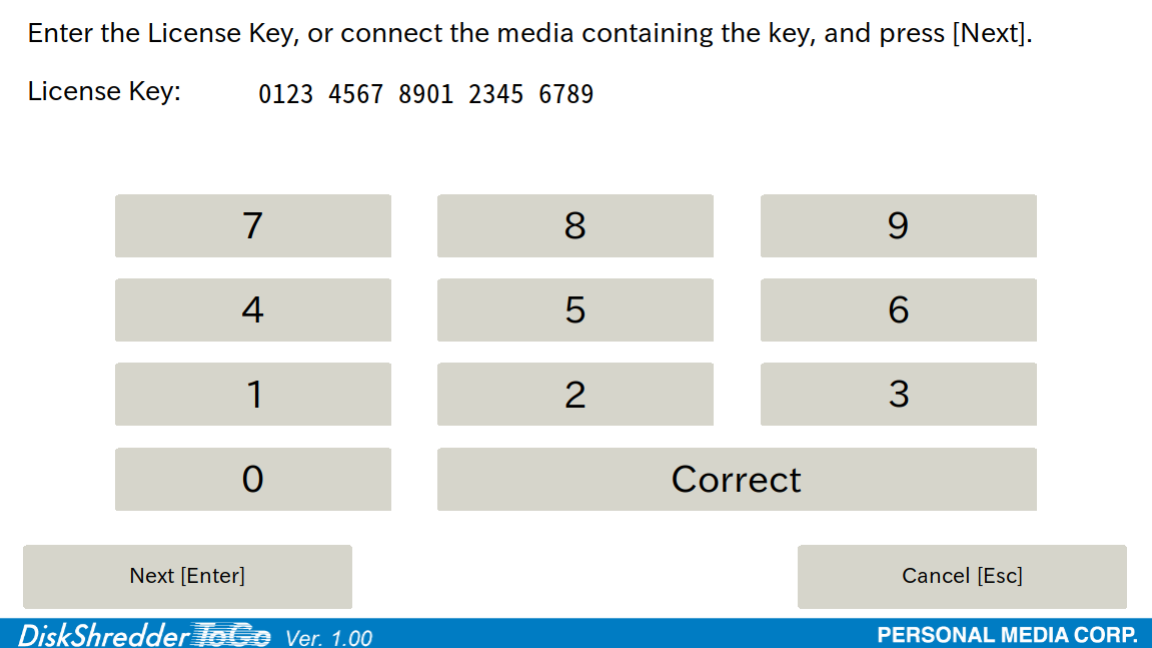
A. License Key
B. HDD Erase
C. SSD Secure Erasure
D. SSD Sanitize Erasure
E. Both HDD and SSD Erasure
F. Displaying disk contents
G. Saving erasure certificate
H. Saving erasure operation report
A. License Key
- Insert the DVD-ROM of the “DiskShredder ToGo” operation check program into
the computer on which you want to erase the disk contents, and turn on or
restart the computer. After a few moments, the “DiskShredder ToGo” startup
screen will appear.
If the Operation check program does not start, please try the following operation.- Immediately after turning on the computer, press the F12 or F9 key or any other key to display a menu for selecting the startup device. Select DVD there.
- Or, on the computer's BIOS screen, change the boot order of the DVD drive to higher than the internal drive.
- If the program still does not work properly, please refer to the FAQs for Users.
- A short time later, a screen for entering the License Key will appear. To use the program as an operation check program without applying the License Key, click the [Cancel] button. Then, the confirmation screen for the disk to be erased will appear.
B. HDD Erase
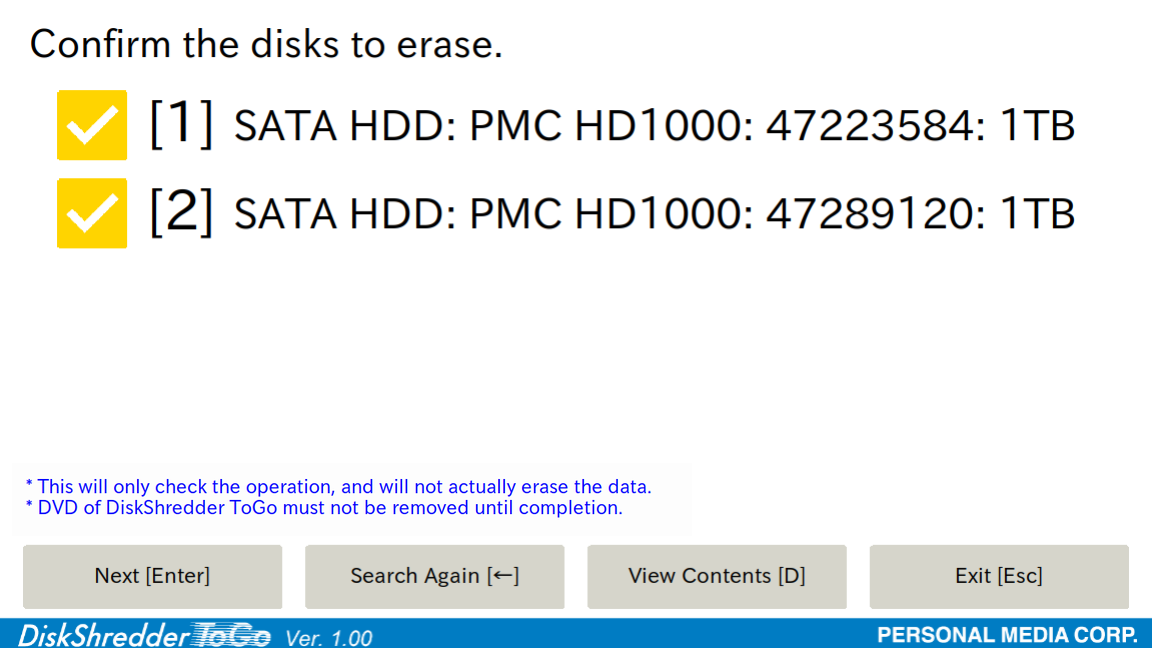
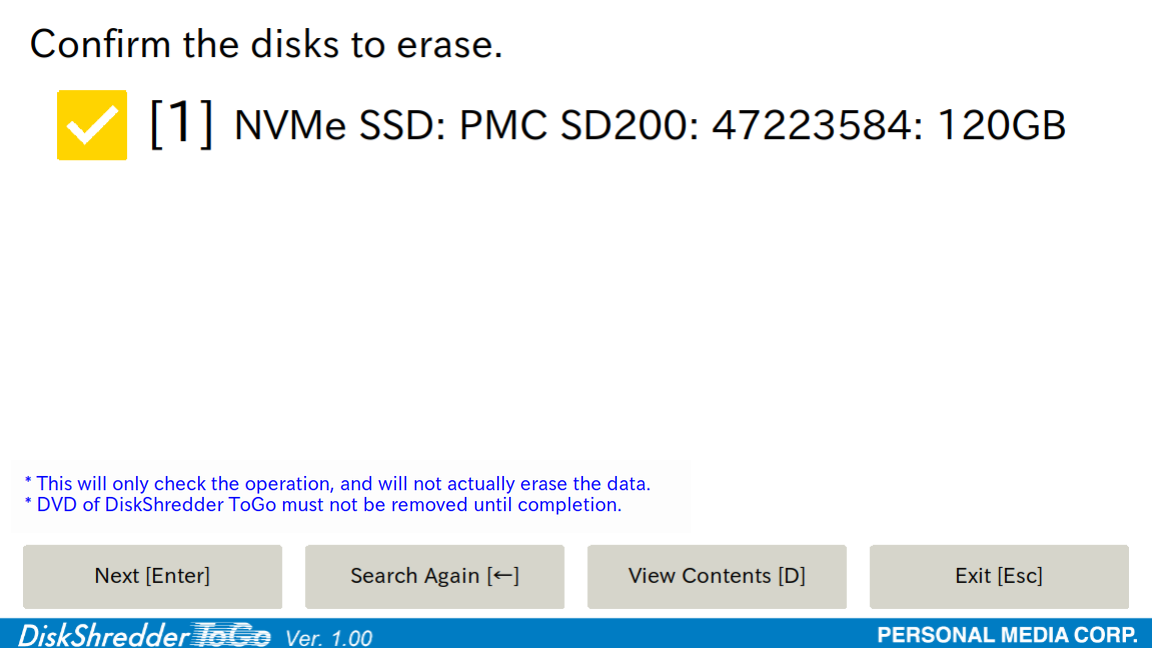
- A list of disks to be erased is displayed. If there are any disks in the list that you do not want to erase, uncheck those disks. After confirming that the target disks for erasure are correctly specified, click the [Next] button (or press the [Enter] key).
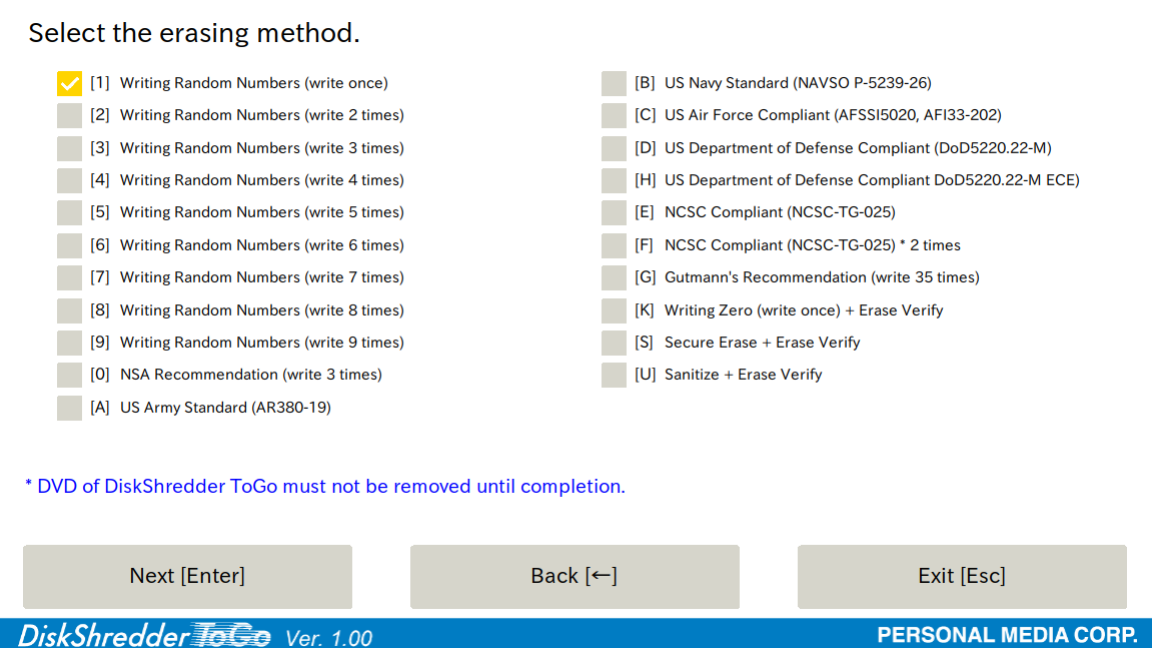
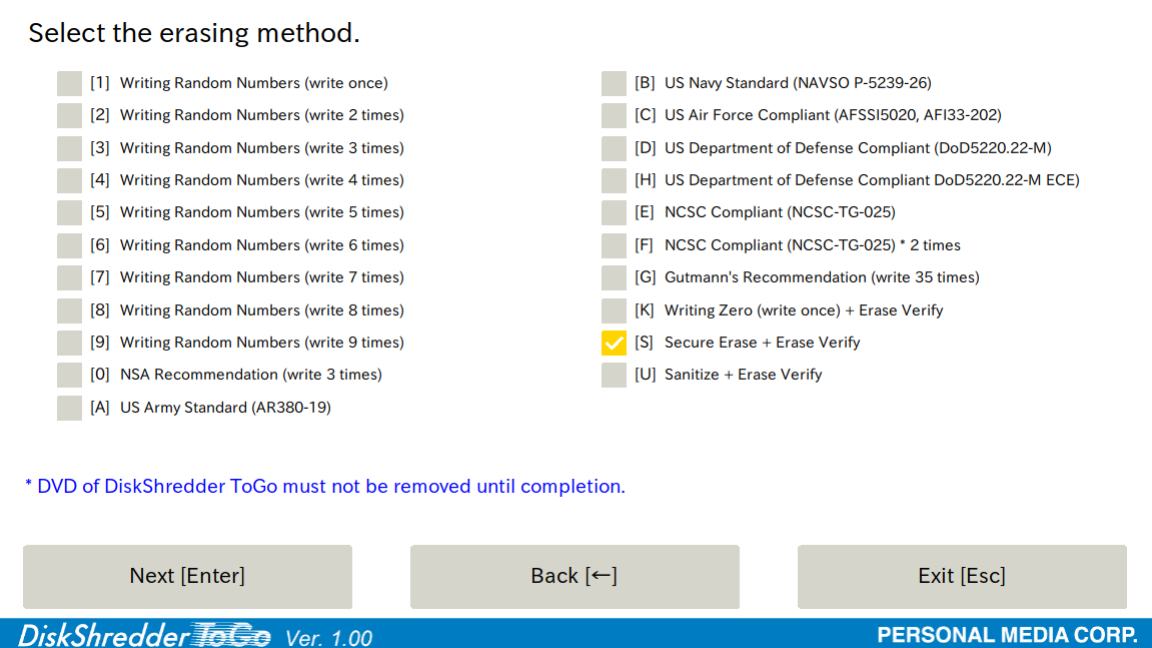
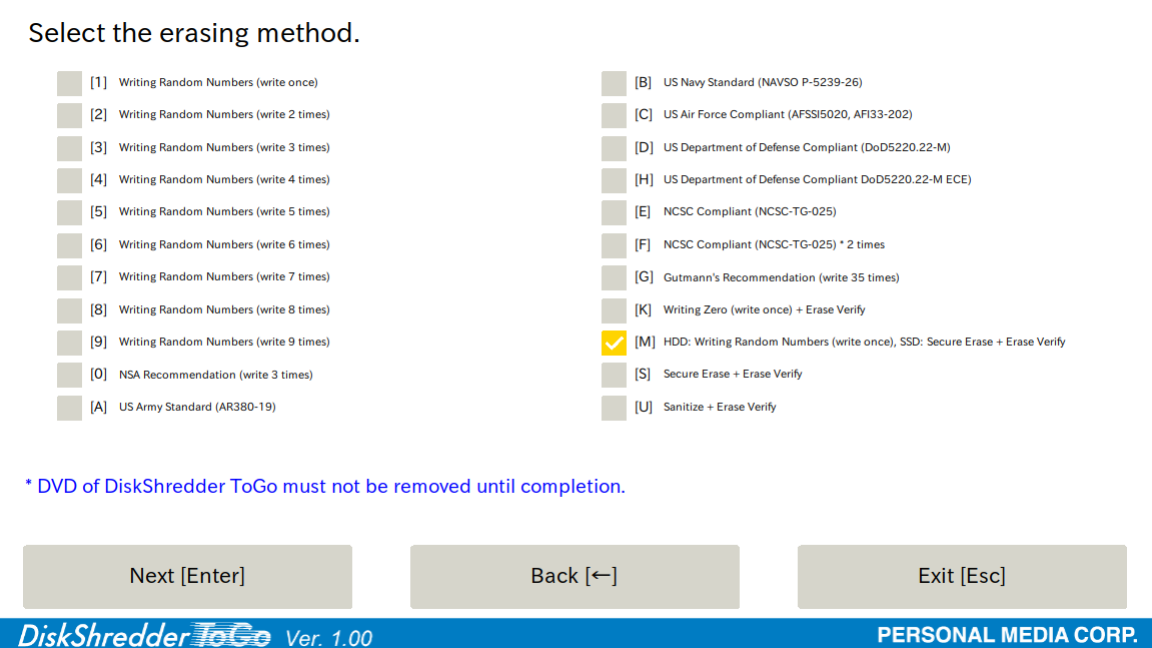
It may take several minutes for the disk list to be displayed. - A screen to specify the erasure method will be displayed. Select the erasure method with the mouse or press the single letter key indicating the erasure method.
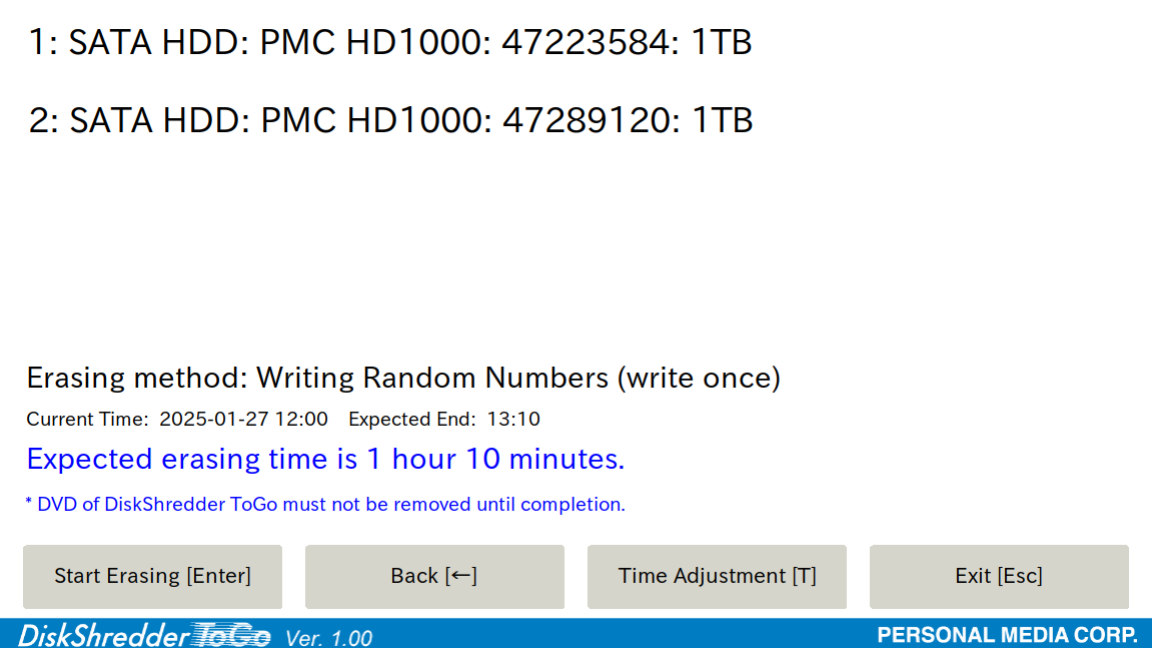
Once you have decided on the erasure method, click the “Next” button (or press “Enter”). - Estimation of the time required for erasure will begin. As data will be written to the disk for estimation, do not turn off the PC's power during estimation.
- After displaying the estimated time required for erasure (estimated erasure time), clicking the [Start Erasing] button (or pressing the [Enter] key) will immediately start erasure.
The program does not perform the actual erasure. - When data erasure is complete, the completion report screen will be displayed.
The following operations are possible on this screen:
Displaying disk contents
Saving erasure certificate
Saving erasure operation report
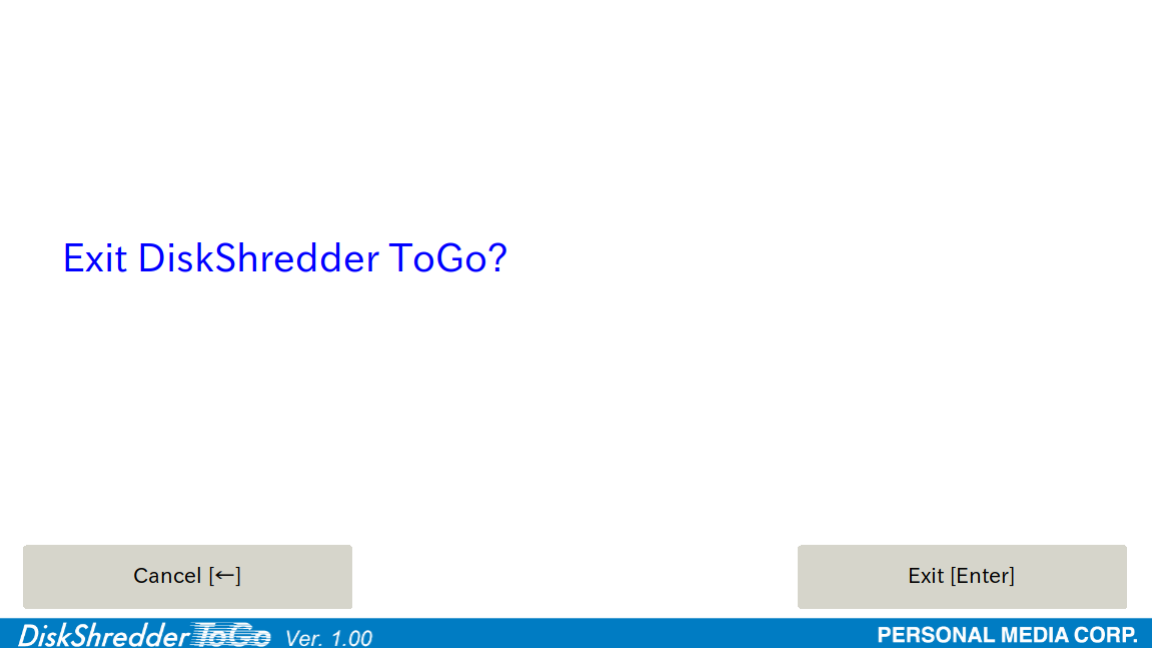
If these operations are not needed or are complete, click the [Exit] button (or press the [Esc] key). - A confirmation screen "Exit DiskShredder ToGo? " will appear. Click the [Exit] button (or press the [Enter] key) to exit. Also remove the DiskShredder ToGo DVD-ROM.

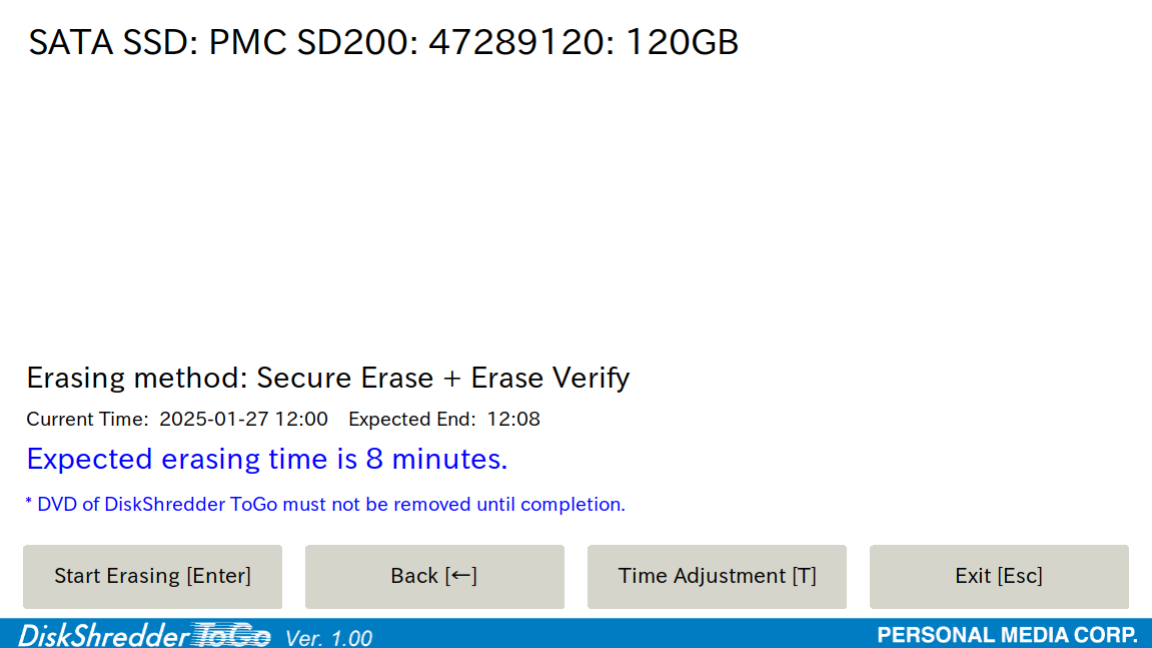
C. SSD Secure Erasure
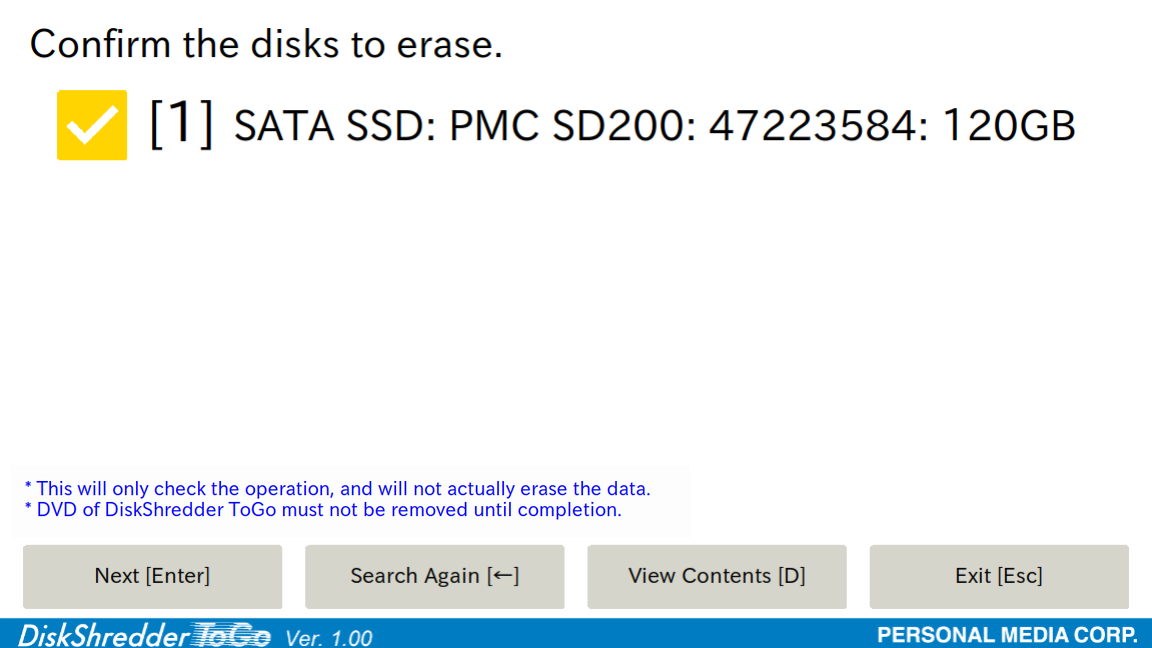
- A list of disks to be erased is displayed. If there are any disks in the list that you do not want to erase, uncheck those disks. After confirming that the target disks for erasure are correctly specified, click the [Next] button (or press the [Enter] key).
It may take several minutes for the disk list to be displayed. - If all target disks are SSDs or eMMC, the "Secure Erase + Erasure Verification"
erasure method ([S] key equivalent) is automatically selected.
Once you have decided on the erasure method, click the “Next” button (or press “Enter”). - Estimation of the time required for erasure will begin. Do not turn off the PC's power during estimation.
- After displaying the estimated time required for erasure (estimated erasure time), clicking the [Start Erasure] button (or pressing the [Enter] key) will immediately start erasure.
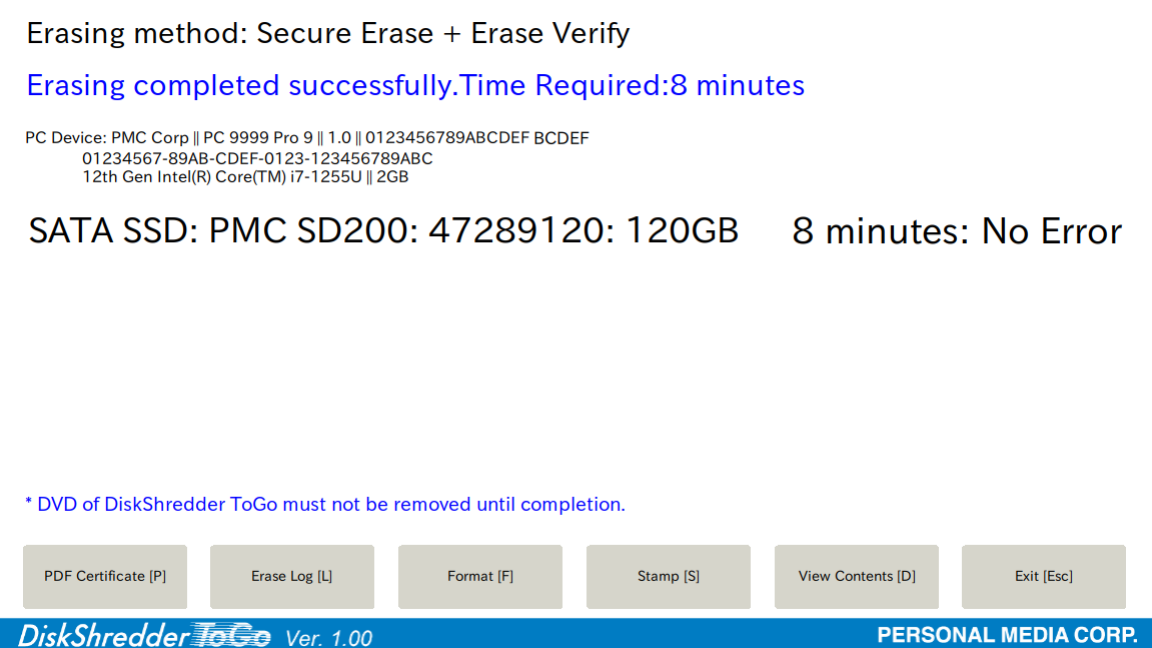
The program does not perform the actual erasure. - When data erasure and erasure verification by the Secure Erase method are complete, the completion report screen is displayed.
The following operations are possible on this screen:
Displaying disk contents
Saving erasure certificate
Saving erasure operation report
If these operations are not needed or are complete, click the [Exit] button (or press the [Esc] key). - A confirmation screen "Exit DiskShredder ToGo? " will appear. Click the [Exit] button (or press the [Enter] key) to exit. Also remove the DiskShredder ToGo DVD-ROM.
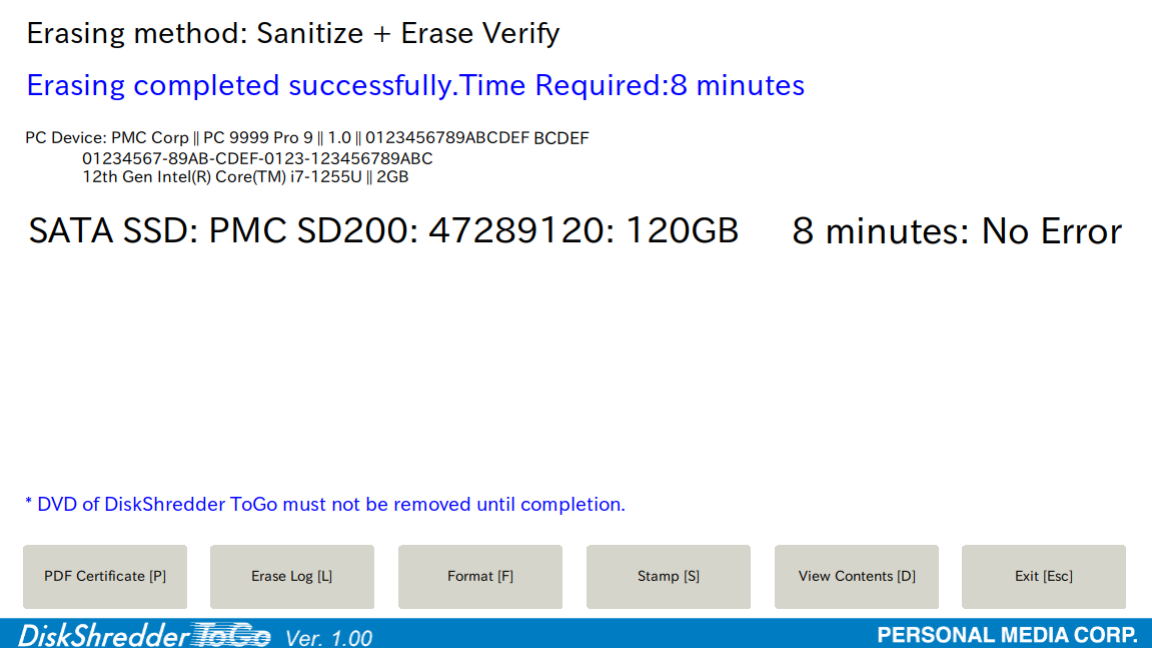
D. SSD Sanitize Erasure
- A list of disks to be erased is displayed. If there are any disks in the list that you do not want to erase, uncheck those disks. After confirming that the target disks for erasure are correctly specified, click the [Next] button (or press the [Enter] key).
It may take several minutes for the disk list to be displayed. - For some disks equipped with the sanitize function, "Sanitize + Erasure
Verification" can be selected. Other erasure methods such as "Secure Erase + Erasure Verification" are
automatically selected, so please change it to "Sanitize + Erasure Verification".
Once you have decided on the erasure method, click the “Next” button (or press “Enter”). - Estimation of the time required for erasure will begin. Do not turn off the PC's power during estimation.
- After displaying the estimated time required for erasure (estimated erasure time), clicking the [Start Erasure] button (or pressing the [Enter] key) will immediately start erasure.
The program does not perform the actual erasure. - When data erasure and erasure verification by the sanitize erasure method are completed, a completion report screen is displayed
The following operations are possible on this screen:
Displaying disk contents
Saving erasure certificate
Saving erasure operation report
If these operations are not needed or are complete, click the [Exit] button (or press the [Esc] key). - A confirmation screen "Exit DiskShredder ToGo? " will appear. Click the [Exit] button (or press the [Enter] key) to exit. Also remove the DiskShredder ToGo DVD-ROM.


E. Both HDD and SSD Erasure
For models equipped with both HDD and SSD, "Random Write Method (1 Write)" for HDD and "Secure Erase + Erasure Verification" for SSD are executed simultaneously.
If you want to execute different erasure methods for HDD and SSD, please select the target disk on the confirmation screen for target disks to be erased and specify the desired erasure method.
For details of each erasure method, please refer to the following.
HDD Erase
SSD Secure Erasure
F. Displaying disk contents
You can display the contents of the disk both before and after data erasure. By comparing before and after erasure, you can confirm that meaningless data has been overwritten.
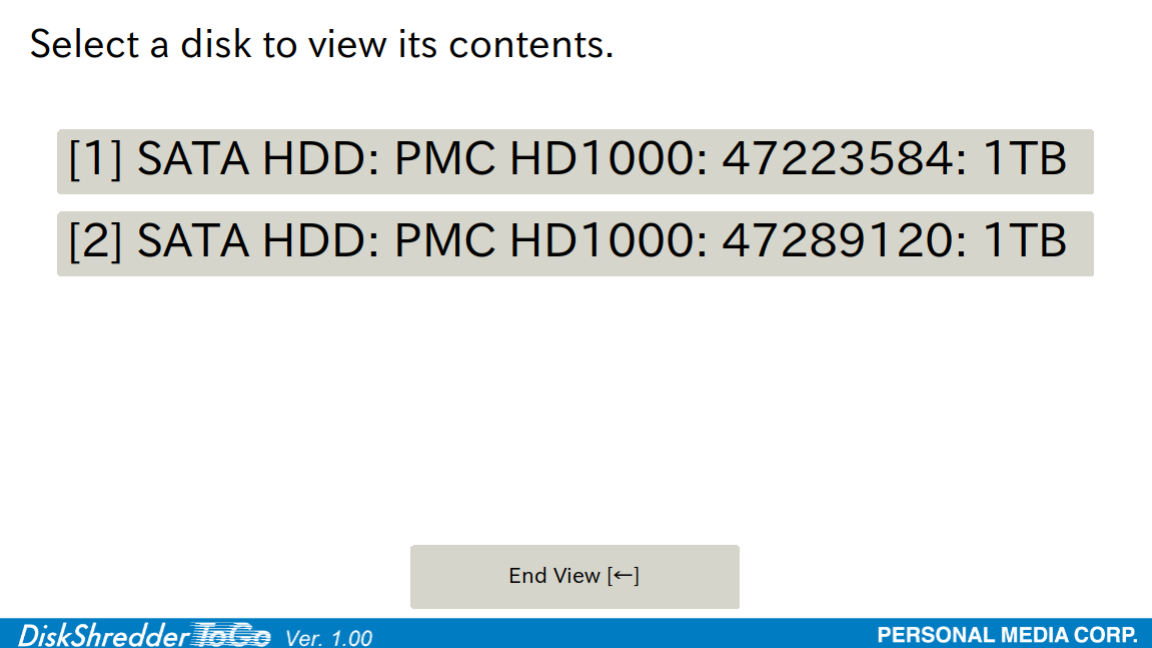
- On the erasure target disk confirmation screen or completion screen, click the [View Contents] button (or press the [D] key).
- If multiple disks are connected, you will move to a screen to select which disk's contents to display. Select the disk you want to check the contents of with the mouse or press the number key corresponding to the number.
- You will move to a screen to input the block number. Click to input the block number you want to check the contents of with the mouse, or press the number keys corresponding to the number, then click the [View Contents] button (or press the [Enter] key).
- Click the [End View] button (or press the [Esc] key). You will return to the original screen.
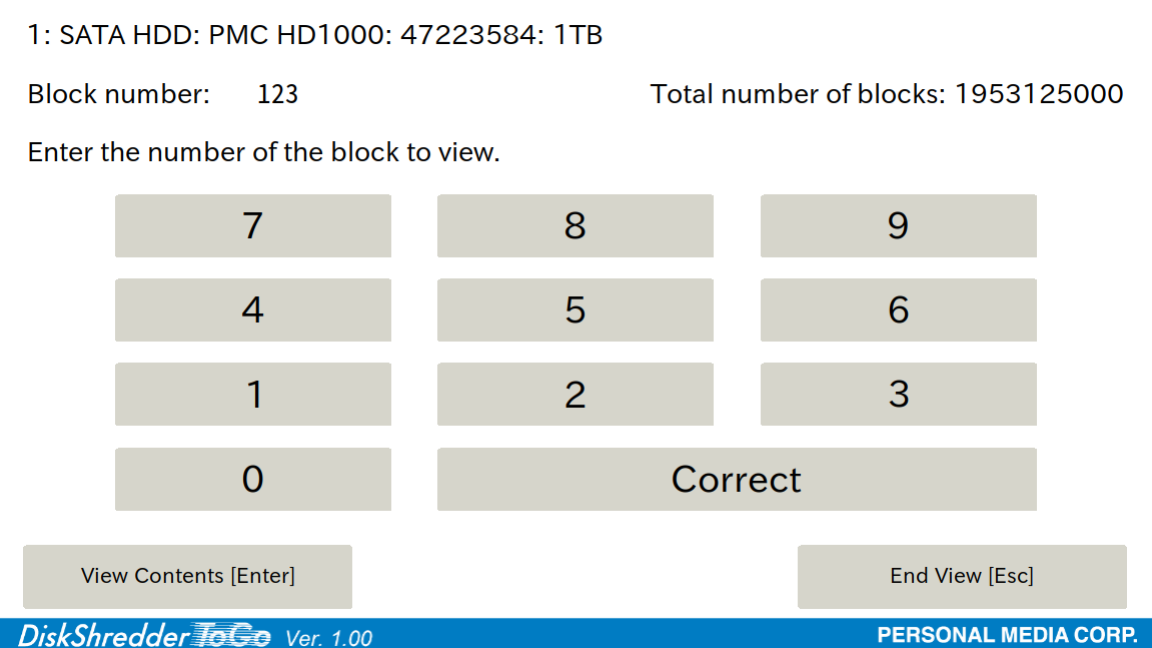
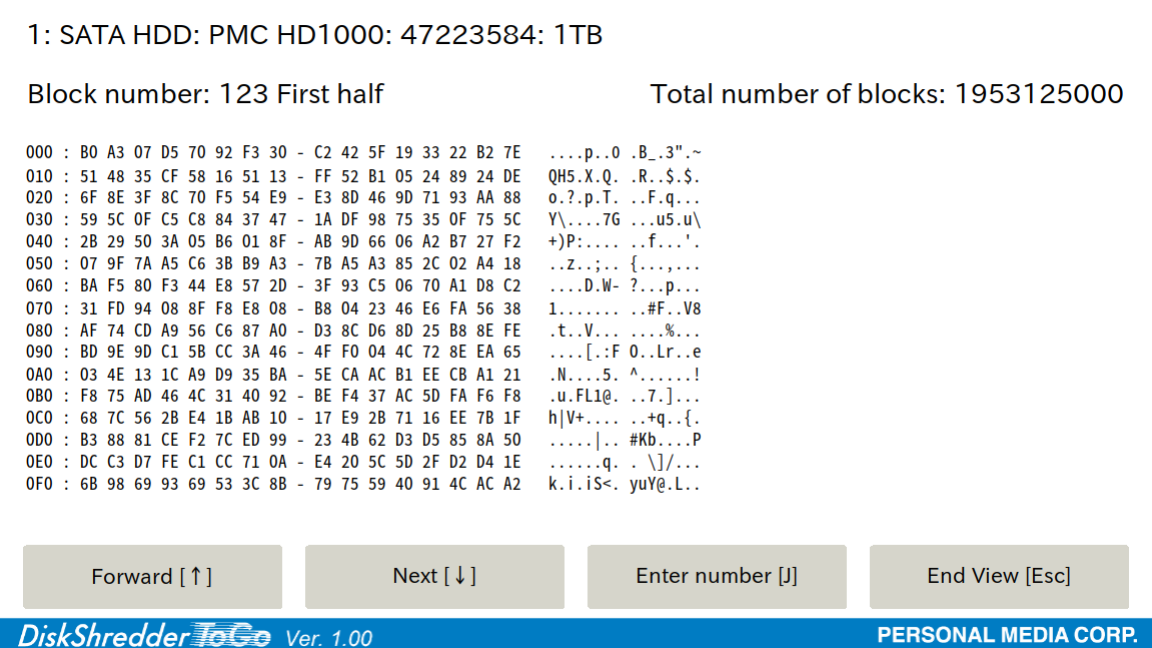
The disk contents are displayed in 256-byte units. The left side shows hexadecimal display, and the right side shows ASCII display. For example, if the total number of blocks for the entire disk is 268,435,456, the block numbers start from "0", so you can specify block numbers from 0 to 268,435,455.
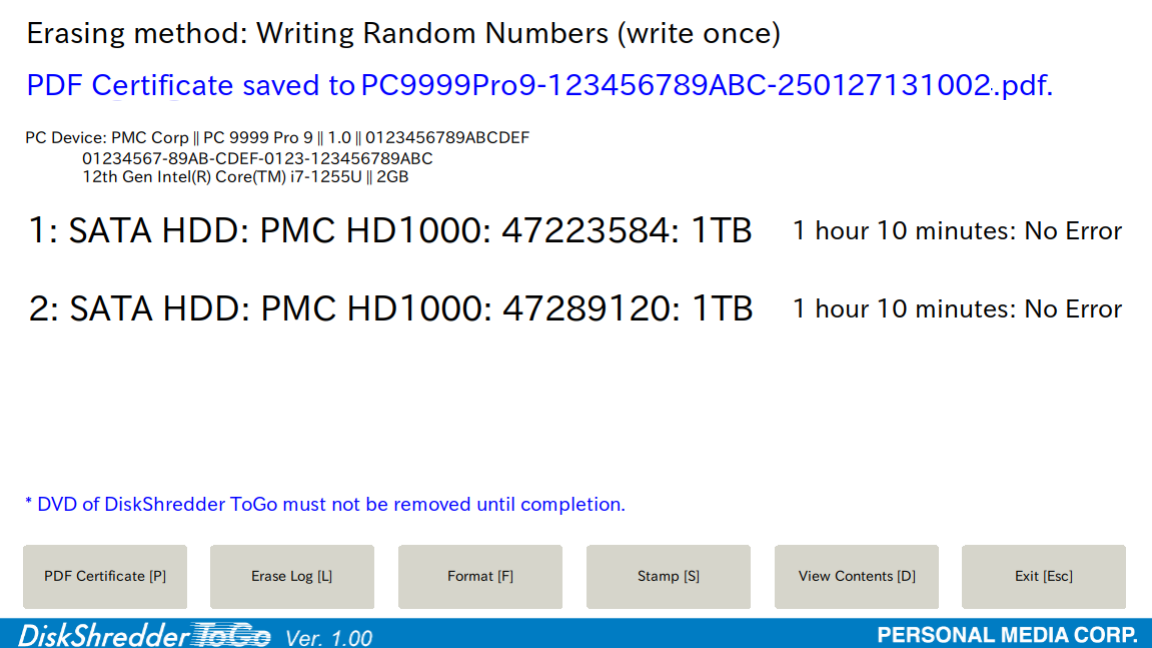
G. Saving erasure certificate
After data erasure, the erasure certificate can be saved to media in PDF format.
The operation check program also does not perform the actual erasure, but it can save the erasure certificate.
Please prepare USB flash drive, SD card, CF card, etc. as the destination media. Please use formatted media such as Windows media. Also, be sure to perform “safe removal” when
removing the device from Windows.
- Connect the media to save the erase report, wait 2-3 seconds and click the [PDF Certificate] button (or press the [P] key). The erasure certificate is saved as a PDF file.
- Connect the media with the erasure certificate to a Windows PC and check the contents of the erasure certificate.
Connect the media with the erasure certificate to another PC, etc., and open it. You will find a PDF file inside a folder called "DS_LOG". Double-click or otherwise open this file to see the contents of the saved erasure certificate.
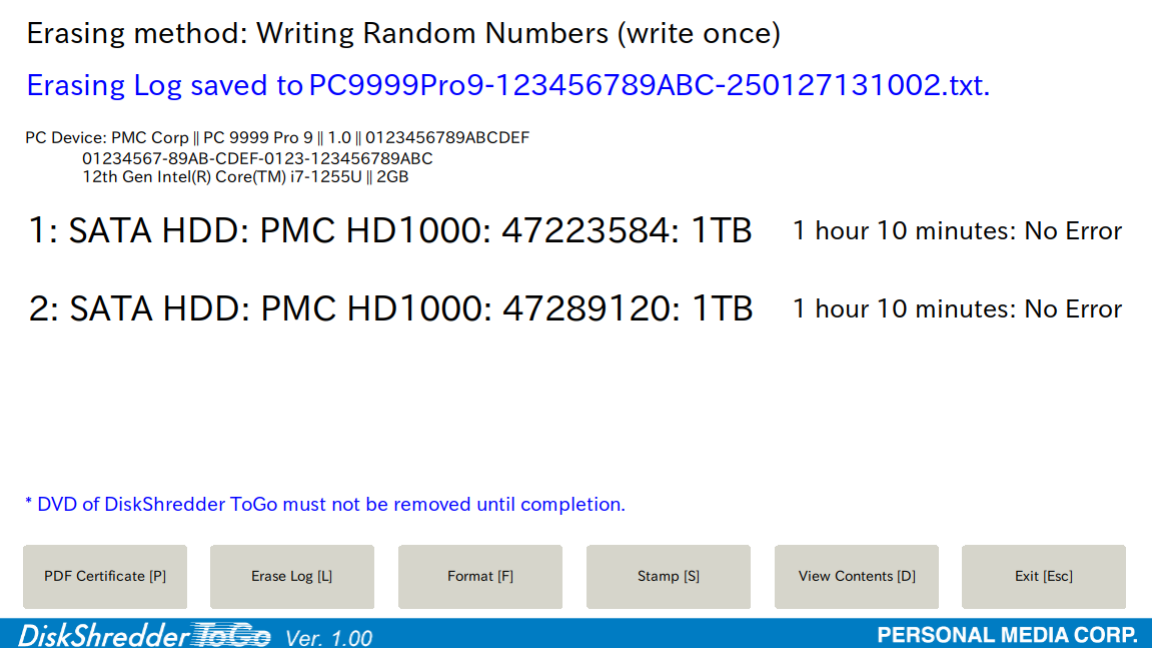
H. Saving erasure operation report
After data erasure, you can save the data erasure record (erasure operation report) in text format to media.
The operation check program also does not perform the actual erasure, but it can save the erasure operation report.
Please prepare USB flash drive, SD card, CF card, etc. as the destination media. Please use formatted media such as Windows media. Also, be sure to perform “safe removal” when
removing the device from Windows.
- Connect the media to save the erase report, wait 2-3 seconds and click the “Erase Report” button (or press the [L] key). The erasure operation report will be saved as a text file.
- Connect the media with the erase report to a Windows PC and check the contents of the erase report.
Connect the media with the erasure certificate to another PC, etc., and open it. You will find a text file inside a folder called "DS_LOG".Open this file with a text editor like Notepad to confirm the contents of the saved erase report
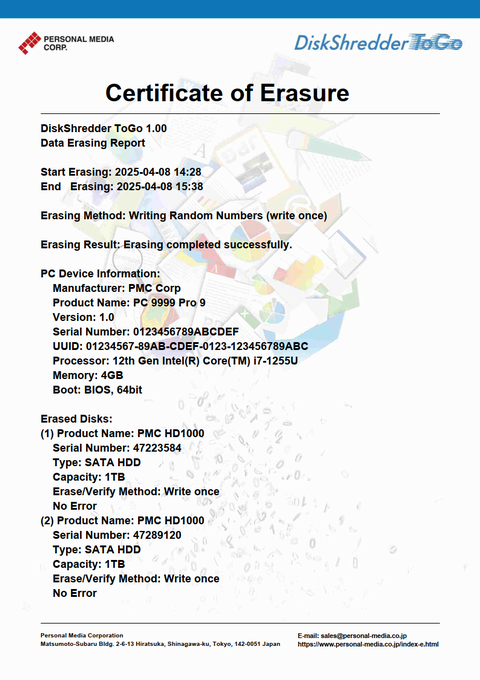
  ------------------------------------------------------------
  DiskShredder ToGo 1.00
  Data Erasing Report
  ------------------------------------------------------------

  Start Erasing: 2025-04-08 14:28
  End   Erasing: 2025-04-08 15:38

  Erasing Method: Writing Random Numbers (write once)

  Erasing Result: Erasing completed successfully.

  PC Device Information:
      Manufacturer: PMC Corp
      Product Name: PC 9999 Pro 9
      Version: 1.0
      Serial Number: 0123456789ABCDEF
      UUID: 01234567-89AB-CDEF-0123-123456789ABC
      Processor: 12th Gen Intel(R) Core(TM) i7-1255U
      Memory: 4GB
      Boot: BIOS, 64bit

  Erased Disks:
  (1) Product Name: PMC HD1000
      Serial Number: 47223584
      Type: SATA HDD
      Capacity: 1TB
      Erase/Verify Method: Write once
      No Error
  (2) Product Name: PMC HD1000
      Serial Number: 47289120
      Type: SATA HDD
      Capacity: 1TB
      Erase/Verify Method: Write once
      No Error

  Copyright (C) 2025 by Personal Media Corporation
- Home
- Operation check program Usage Guide